
Common Questions (FAQ)
What is Roof Restoration?
“Roof Restoration” is a term that is used to describe the process of cleaning, repairing and re-coating a roof. It is designed to extend the useful life of your roof before eventual roof replacement and to improve the aesthetics of your home and property. To find out more visit our Roof Restoration page.
Who are Reliance Roof Restoration?
Reliance Roof Restoration are one of Australia’s leading home roofing companies specialising in roof restoration and roof replacement of tile, metal, asbestos and other types of roofing materials. Founded in 2002 we have restored over 10,000 homes in Queensland, New South Wales & Victoria.
We are members of The Master Builders Association in Queensland & New South Wales and the Housing Industry Association. Our QLD BSA number is 1214303, our NSW Contractors License Number is 245249C, we are an approved contractor in Victoria and our ABN is 90 153 695 240.
Why choose a large Roof Restoration Company like Reliance Roof Restoration?
Our customers tell us they choose Reliance Roof Restoration for the following reasons:
- Quality Control– Most larger companies will have processes in place to ensure quality. Normally an inspection from a supervisor or manager will detect quality issues and rectification will take place before final payment is made. This also gives the client someone to discuss issues with separate to the tradesperson doing the work. This avoids the need for confrontation between client and tradesperson.
- After-sale service– If you’ve ever tried to get a tradesperson back to your home after he’s finished a job, you’ll know how difficult this can be! A larger company will have processes in place to handle after-sale service and other tradespeople to call on if required.
- Long-term focus on quality– It’s harder for a large company to hide should there be problems with the job. Therefore, you’ll normally find that a large company has a focus on quality to preserve their reputation. Warranty claims can ruin a company and you’ll find that most of the big guys are know this, and take measures to minimise potential warranty claims down the track. They are also conscious of damage to their reputation and will operate with preservation of reputation in the forefront of their mind.
- Service– Because they have office staff, you’ll normally be able to reach someone at a larger company. When you need to phone up and ask a question, you’ll be able to get the answer. The smaller guys who operate from their mobile phone will generally be harder to reach.
- We stand behind our warranty –Many of our customers are impressed by the fact we stand behind our warranty and find peace of mind in the fact that they know that we’ll still be around to honour our warranty.
While due to few over-heads, a smaller company or “one man band” type operation will generally be at the bottom of the pricing scale there can be pitfalls with using these firms. A large percentage of small operators will also sub-contract to larger companies. When times are good they’ll be doing plenty of their own work and when they run out of work they’ll go back to sub-contracting to larger companies and abandon their own company in the process. If you need to get them back, you’ll find it difficult because they’ve closed their company down. They don’t have a supervisor or someone else checking their work. Even really good tradespeople can get slack at times or make mistakes. These mistakes can go undetected if no quality control inspection takes place. Or you notice the mistake and have to confront the tradesperson which is uncomfortable for most people.
How do I know I can trust Reliance Roof Restoration?
Reliance Roof Restoration is a professional roofing service and we hire bonded and insured roofers who pride themselves on quality roofing services. Before joining our team each roofer is trained to perform the detailed roofing plans to our customers’ specifications. We stand behind our work with our guarantee; if you’re not completely satisfied contact us and arrange for us to come back and redo the specific areas that did not meet your expectations.
We are members of The Master Builders Association in Queensland & New South Wales and the Housing Industry Association. Our QLD BSA number is 1214303, our NSW Contractors License Number is 245249C, we are an approved contractor in Victoria and our ABN is 90 153 695 240.
We are fully bonded and insured, our people being covered by Worker’s Compensation and we have 20,000,000 of public liability cover.
How do you restore our roof?
The process for roof restoration varies slightly depending on the roof type. The example below is typical for a concrete tile roof or metal roof, for more information visit the roof restoration page:
Step 1 – Repairs
On a tiled roof, any broken or cracked tiles must be replaced. On a metal roof, any re-screwing or sheet replacement should be done first. Any other repairs such as replacement or repairs to flashings (this applies to both tiled and metal roofs) should be done before moving to the next step.
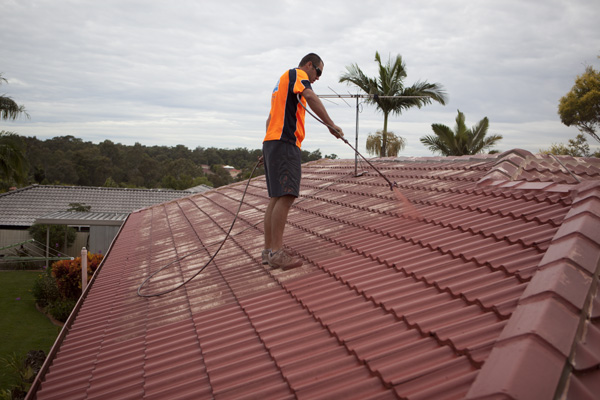
Step 2 – Pressure Clean
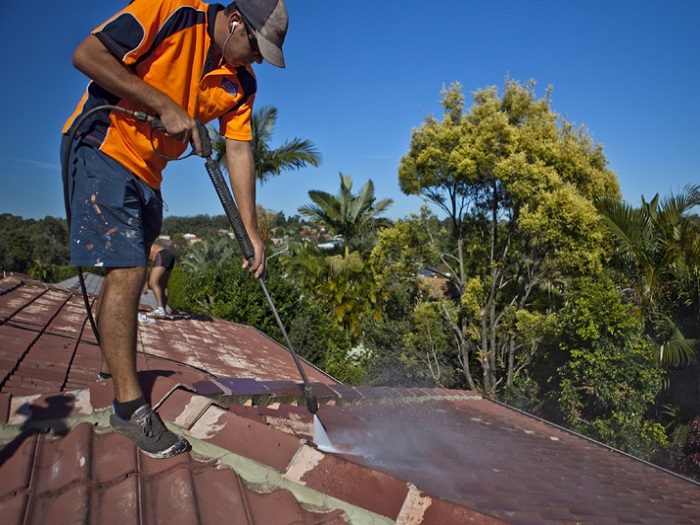 The roof must be pressure cleaned thoroughly with a minimum of 3000 p.s.i (pound per square inch) pressure. An average household Gurni will typically put out less than a third of this so an industrial strength water blaster is required.
The power of the water blaster is paramount on all types of roofs but especially tiled roofs because roof tiles, by the time they are 10 years old, have lost their glaze. Once the glaze has eroded, the coating underneath oxidises and becomes very chalky. This chalkiness must be removed, along with the dirt and grit that’s on the surface and in the craters and pores of the tiles.
Special attention must be given to cleaning the tile noses (the ends of the tiles). Where most people come unstuck in cleaning a tiled roof is in cleaning the tile noses. If you ever see a bad roof restoration job, the first thing that stands out is how the ends of the tiles are black. This is simply because they weren’t sufficiently cleaned.
An inexperienced cleaner will avoid cleaning the noses, though, through fear of flooding the ceiling cavity. You see, done the wrong way, cleaning the tile noses will push water up under the tiles and into the roof. It’s catch 22. You have to get them spotless, but you don’t want to flood the ceiling!
To avoid flooding the ceiling, you need to hold your lance at around 60 degrees and you must move fast to avoid putting too much water in one place.
WARNING: If you are restoring a pre-painted roof, refer to our article titled “Why Roof Restorations Fail” in the “How Long Do Roof Restorations Really Last” section of the FAQs for recommendations on how a roof that’s been painted before should be prepared.
Step 3 – Re-bedding and pointing
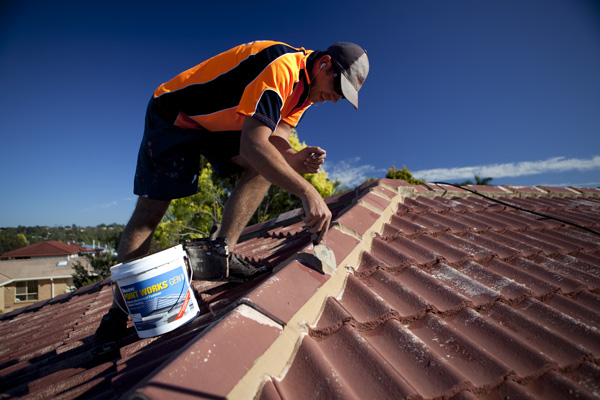 If yours is a tiled roof, it will more than likely need re-pointing and perhaps even re-bedding. If it needs re-bedding (it will need re-bedding if the ridge caps are loose), this involves removing the ridge caps and laying a new concrete bed. You should hire bedding rails (these can be hired or bought from some roof tiling supplies yards) to get a neat and straight bed. Mix sand and cement with a 4 : 1 mix, and add a plasticiser to the mix to help it stand up. The ridge caps are then laid on your new cement bed.
Once the bedding is dry (next day is best but you can point over a new bed same day on warmer days) you can apply the pointing. A polymer-based flexible pointing mortar should be used. The flexibility is vital as roofs are subject to a lot of movement and you need a mortar than can cope with this movement. The pointing should be applied with a pointing trowel at between 3mm and 5mm thickness. Any thicker will make the mortar skin over but not dry properly underneath the skin and the pointing will sag.
In most cases, if the ridge caps were not loose, re-bedding is not required, in which case you would miss this stage and just apply the pointing over the top of the existing pointing.
Step 4 – Primer
The next stage is to apply the primer or sealer. You should leave the pointing to dry over night and apply the primer/sealer the next day.
For a tiled roof you should use a concrete tile primer or sealer. For a metal roof, you need a “Gal” primer.
Using an airless paint machine with a 5/19 tip, you should apply the primer using the recommended coverage rates. The coverage rates depend on whether or not the roof is pre-painted. For a non pre-painted roof, you’ll need approximately 15 litres per 100m2 for a tiled roof, and approximately 10 litres per 100m2 for a metal roof. With a pre-painted roof you’ll use more. How much more will depend on the thickness of the previous coating (if you couldn’t get it all off). The thicker the previous coating and therefore the more pronounced the edges are, the more primer you’ll need. It’s difficult to give exact coverage rates in these situations but it can be up to 50% more than is required on a non pre-painted roof.
Step 5 – Filler Coat if required
With a tiled roof, if the roof is quite bare and/or rough, then you should use a filler coat to “build” the surface and smooth it out. This will give you a much nicer finish with the top coats and avoid the patchy look you often get when re-coating old bare roof tiles. As with the primer, you should use an airless paint machine, however, a larger tip is required for applying filler coat (a 5/21 is usually sufficient).
Step 6 – Two Top Coats
 Using an airless paint machine with a 5/19 tip, you should apply the top coats using an up and down (from gutter to ridge) pattern, getting a full stroke from the gutter to the ridge and full stroke back down again wherever possible. This avoids join marks in the coating and is especially important on a metal roof where join marks show up significantly.
Make sure you angle the gun upwards towards the tile noses (ends) as they need very thick coverage due to their roughness and craters. Some applicators will actually spray the bottom 3 rows of noses first (going around the roof instead of up and down) as they are the hardest to get good coverage on due to the angle you need to hold your gun at being difficult to achieve as you get close to the edge of the roof.
Whichever way you do it, on a tiled roof, make sure that you get super thick coverage on the tile noses. This is one major difference between a good job and a bad job. On the amateurish jobs, the noses will be too thin and will go black within a couple of years.
The coverage rate you need to aim for depends on the roughness and porosity of the tiles. As an average, most roof coatings will cover well at 1 litre per 5 metres per coat (1 : 2.5 including both coats). If you cover at these rates and the roof still looks like it needs more coating, you will need to apply another coat. If you do a very rough or bare roof, allow for 3 top coats (or use a filler coat as your first top coat – the coverage rate for filler coats is approximately the same as for the standard top coats, although you might want to apply it slightly thicker to give you an even better finish).
Step 7 – Hand Painting and Cutting In
Most roofs will have some parts that can’t be sprayed. For example, barge capping, dutch gabes, lead flashings where they go into a wall, etc. These parts will need to be hand painted.
Drying Times
Check your paint manufacturers recommended dry times and stick with these because it will affect your warranty.
As a guide, though, at 20 degrees C plus, most water based roof coatings can be over-coated within an hour. At 15 – 20 degrees, it can be 2 – 3 hours. 10 – 15 degrees will need 3 – 4 hours, on average. Under 10 degrees may need to be left until the following day before you over-coat.
Avoiding Over-spray
Any nearby walls, dutch gables, finials, sky lights, or other items on the roof should be masked up or covered with tarps or plastic. You can purchase masking tape and plastic from most hardware stores or paint shops.
Never spray on gusty days. Slight breezes are usually okay but never spray in high winds.
How much should a Roof Restoration cost?
Reliance Roof Restoration has had extensive independent market research conducted into roof restoration costs. Our research has shown that for smaller (100 – 180m2) roofs, prices vary from around $28 – $38 per square metre for smaller roofs (depending on the amount of repairs required). Medium sized roofs (180 – 240m2) come in at around $22 – $28 per square metre. Larger roofs (240m2 +) between $17–$22 per m2.
When reviewed by an independent consulting firm,Reliance Roof Restoration were number one in both Brisbane & Sydney in the value for money category which included factors such as price, the level of customer services and quality. Remember the quality of materials used including the thickness and number of coatings applied will impact on how long your roof restoration will last, the cheapest quote rarely ends up the cheapest quote in the long run!
Who does Reliance Roof Restoration hire to provide roofing services for my home?
Our roofing professionals are trained, bonded and insured before stepping into Reliance Roof Restoration’s uniforms. Our residential roofers respect customers by treating your home as if it was their own during roofing work and ensuring everything is clean and just the way it was when we leave the job site. Each Reliance Roof Restoration employee takes pride in their work, receiving regularly updated training and supervision to ensure a quality roofing service.
Can I finance my roof restoration or re-roofing job?
Yes, Reliance Roof Restoration offers no interest finance of up to $14,000 through Certegy with a range of financing terms to suit your budget and up to 24 months payment period. The process of arranging finance involves a one time easy application process – no need to reapply the next time you make a purchase. Approvals happen fast and you can choose your choice of weekly, fortnightly or monthly payment frequency.
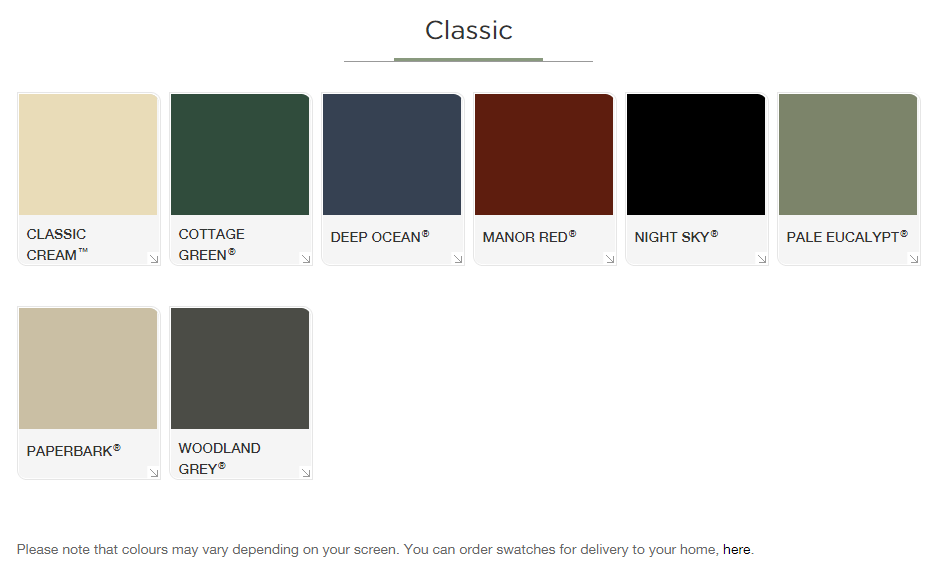
What color should I choose for my roof?
Colour choice and what roof colour is “right” for your home is totally subjective. You can get two people together and one will love a colour and the other will hate it. Therefore, there is no “right” colour for your roof. Ultimately it’s going to come down to personal taste. There are, however, some tips that can help with your colour choice and save you from ending up with a colour that you’ll dislike.
Firstly, you need to consider the other colours around your home (or your proposed colours if you are re-painting the exterior of the house). You want to bring in one of the other colours from the home when choosing your roof colour. For example, if yours is a brick home and you have a particular fleck in the brick, then choose a roof colour similar to the fleck colour. Or choose one similar to your window frames. Or your driveway if it’s coated in a colour.
Try to follow colour themes wherever possible. The traditional red, green and cream, for example. Or greys (dark grey against white grey or vice versa). Or beiges and browns. Drive around a new estate for ideas if you are looking to “modernise” the appearance of your home. Go through older areas with a lot of renovation activity for ideas if you have an older home and you are looking to preserve the home’s “vintage”.
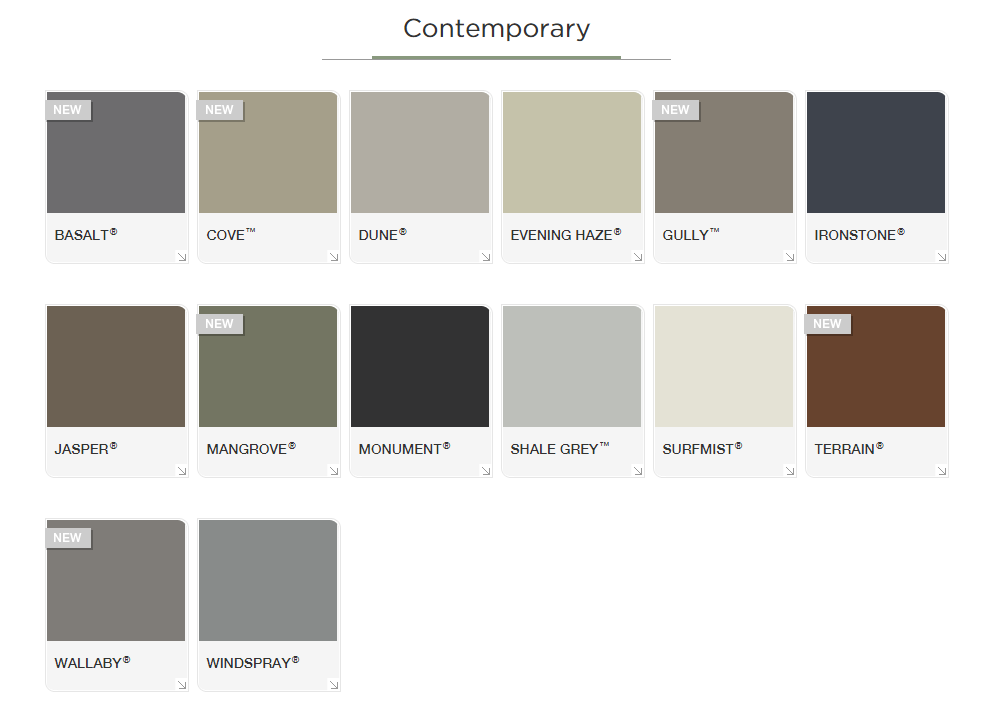
A word of warning is to be careful of the difference between how colours appear on the colour chart and how they look on the roof. The most common area where people get “tripped up” in their colour choice and end up disappointed is in not understanding that it is often significantly lighter.
There are several reasons for this:
 On the colour chart, the colour is likely against a white background which makes the colour appear darker than it is.
The angle of the roof (15 – 30 degrees, typically) makes the surface pick up a lot of glare. this makes the colour appear lighter on the roof.
When on a wide area (such as on a roof), colours always appear lighter.
It’s very common for people to choose a roof colour and comment that they wanted it to be much darker. The colour is most often accurate, and if you take the colour chart on the roof you see that close up the colour is correct, but the illusion that the above three factors create makes it look vastly lighter from the ground.
So a handy tip is to choose a colour that’s darker (on the colour chart) than what you’d like. This will likely turn out, on the roof, something close to what you wanted.
Another helpful hint is to choose your roof colour by seeing the colour on a roof. Ask the company who you are considering using for your roof restoration to provide you with an address of a roof that they’ve done in a colour that you’re considering.
If you follow these tips and remember that the colour appears lighter on the roof than on the colour chart, you’ll end up with a colour that you are happy with nearly every time.
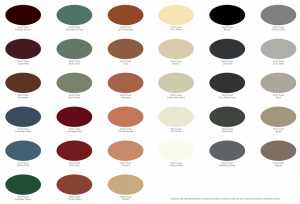
In 2012 Reliance Roof Restoration completed over 1,200 roofing jobs of which 828 were roof restorations. We thought that since choosing the right coating colour for your new roof is often an important part of the decision making process we’d share the most popular colours our customers selected in that with you. It’s important to note trends to change over time and please talk to your roofing consultant for more information on trends and suggests they may have if you are stuck on colour choice.
Roof Coat Charcoal (approximately 9% of customers chose this)
Roof Coat Roof Red (approximately 6.2% of customers chose this)
Roof Coat Tuscan Red (4.2 % of customers chose this)
Roof Coat Heritage Red (approximately 3.9% of customers chose this)
Roof Coat Valencia *approximately 3.8% of customers chose this)
Overwhelming Red was popular in 2012 with other popular colours including ebony, battleship grey, Afghan, Glaze, Charcoal, Mid Terracotta, Tile Terracotta also being homeowner favourites. We hope this helps you make up your mind!
* Note this data was gathered from Brisbane and Sydney only.
How long will my roof restoration really last?
Some Roof Restoration companies make claims that their work will be good for 20-25 years. This is simply not true! A “good job” using a quality coating, enough coating and done with the right preparation by a quality tradesperson will last approximately 15 years*. This figure is based on both data collected and simple observation.
*Disclaimer: Subject to sunlight (UV) conditions, coating colour choice and mould growth.
Why Roof Restorations Projects Fail
The next time you go for a drive, if you take notice, you’ll see roofs with peeling paint. There was a time when this was the excepted norm, especially with metal roofs. Times have changed, though. Roof coatings have improved, as have application methods.
These days the only reasons a roof coating will blister, peel, or flake off, is if the roof wasn’t prepared properly, insufficient primer or no primer was used, or the surface wasn’t completely dry when the paint was applied.
This sounds really simple but there is much you need to know, especially in regards to the preparation.
Preparation for tiled roofs:
The roof must be pressure cleaned at a minimum of 3000 p.s.i. Most domestic water blasters don’t even come close to that (the average household Gurni puts out 1000 – 1500 p.s.i), which is why most DIY roof restorations fail. Most credible roof restoration companies will use machines that put out at least 3000 p.s.i, but normally upwards of 3500 p.s.i.
The power of the water blaster is paramount because roof tiles, by the time they are 10 years old, have lost their glaze. Once the glaze has eroded, the coating underneath oxidises and becomes very chalky. This chalkiness must be removed, along with the dirt and grit that’s on the surface and in the craters and pores of the tiles.
Where most people come unstuck in cleaning a tiled roof, however, is in cleaning the tile noses (the ends of the tiles). If you ever see a bad roof restoration job, the first thing that stands out is how the ends of the tiles are black. This is simply because they weren’t sufficiently cleaned.
An inexperienced cleaner will avoid cleaning the noses, though, through fear of flooding the ceiling cavity. You see, done the wrong way, cleaning the tile noses will push water up under the tiles and into the roof. It’s catch 22. You have to get them spotless, but you don’t want to flood the ceiling!
An experienced cleaner, however, knows the exact angle to hold the lance at to get the noses spotless, yet avoid flooding the roof. Speed is also a factor. You must move fast to avoid putting too much water in one place. Only a skilled and experienced operator has enough practice to be able to move fast enough to avoid pushing water inside, while still doing a thorough job. This is vital.
Preparation for Metal Roofs:
Preparing a metal roof is similar to preparing a tiled roof, especially if the roof is pre-painted. If it’s not pre-painted, then the critical factor is removing all of the dirt and grit. We still recommend a water blaster capable of putting out 3000 p.s.i for a metal roof too, even though you’re not removing oxidised coating.
You need to get every centimetre of the roof spotless. There should be no streaks left by the water blaster.
Preparing Pre-painted Roofs:
Whether tiled or metal, if the roof is pre-painted, then the preparation will likely involve stripping the old coating. And this is not easily done.
If the old coating is peeling or flaking off, then you know straight away that you’ll need to strip it. If it’s not peeling or flaking, then you’ll find out when you start cleaning.
When you hit the roof with 3500 p.s.i, if the coating that’s on there is even a little loose, it will start to come off. Then you need to try and strip as much off as possible. This can often involve two cleans. You see, as mentioned above, speed is a critical factor, yet moving fast means that you won’t get enough off. In that case, you need to go back for a second go at it. The second clean, however, is best done a couple of days later, when the edges of the remaining paint have curled up, allowing you to get more off on your next clean.
Now here’s the key to making it work…..
After your second clean, you need to get the primer on the roof as soon as it’s dry. If you wait until next day, any paint that you couldn’t get off on your second clean will curl up on the edges. And you can’t paint over curled edges – it looks terrible!
Now, if you’ve cleaned it at 3500 p.s.i twice and there is still paint on the roof, it’s safe to assume that it’s well adhered and it will stay there. So it’s okay to coat over this left-over paint. But you must get the primer on before the edges curl.
There’s another key…..
You need to use a lot more primer when coating a pre-painted roof. Flood the surface with primer in this case. Really flood it on to the point that it’s literally running off the roof into the gutters. This further helps lock down the edges. If time permits, it’s a good idea to get a top coat on same day as well. The weight of the top coat does more to weigh down the edges and keep them locked down. A word of warning, though…..
You must use a water based primer to make this work. Solvent based primers cannot be over-coated same day, whereas water based ones can.
Primer:
In avoiding roof coating failures, the type of primer used, the amount of primer are also critical factors. Firstly, for a tiled roof you should use a concrete tile primer or sealer. For a metal roof, you need a “Gal” primer.
The amount depends on whether or not the roof is pre-painted. For a non pre-painted roof, you’ll need approximately 15 litres per 100m2 for a tiled roof, and approximately 10 litres per 100m2 for a metal roof. With a pre-painted roof you’ll use more. How much more will depend on the thickness of the previous coating (if you couldn’t get it all off). The thicker the previous coating and therefore the more pronounced the edges are, the more primer you’ll need. It’s difficult to give exact coverage rates in these situations but it can be up to 50% more than is required on a non pre-painted roof.
If you get the above (proper cleaning/preparation and correct amount of primer), and you’re using a quality roof coating system, then the roof should never flake or peel. But it’s easier said than done. That’s why you should only ever engage an experienced company or operator to restore your roof.
What about porous tiles?
Many roofing companies will tell you the roof gets porous when the coating wears off. This is probably the biggest myth used to sell roof restorations and overpriced or unnecessary repairs. It is more of an exaggeration than an outright lie, you see, a new tiled roof has a protective glaze on its surface. This glaze wears off after about 8 – 12 years, exposing the oxide coating underneath. This coating gradually wears away (U.V rays break it down, and small amounts of the oxides wash off each time it rains), so some bare concrete will start to appear at around the 20 – 25 year mark. Some roof restoration salesmen will tell you that this means your roof is porous, and that in enough rain, water will soak all the way through your tiles, causing leaks.
While, yes, concrete is porous, the concrete used for roof tiles is so dense that water will never soak all the way through the tiles. There are benefits to re-coating your roof tiles but preventing leaks is not one of the benefits.
Home owners all over Australia are being sucked in by exaggerations of minor problems, sales tricks, or outright lies. You see, roof restoration is one of those industries that, unfortunately, attracts rogues and “fly by nighters”. This is because most people are unable to get on their roof to inspect it’s condition, so the rogues prey on trusting people by inventing problems that don’t exist, selling over-priced roof restorations to honest, hard working people who don’t need and can’t afford such expensive “repairs”.
Our roofing consultants and estimators will take pictures and video of your roof to show you any issues. May often use Facetime, Skype or other video calling tools to show you issues they may find while on your roof and communicate the pros and cons of various solutions to you while you are in the comfort of your own home.
Does any water get in when you clean the roof?
Yes, a small amount similar to the amount that would get in during a storm.
Is my asbestos roof dangerous?
The short answer is “yes” if the asbestos is disturbed. Asbestos is a health risk when extremely fine particles become airborne and are inhaled. These breathable fibres cannot be seen with the eye, but can enter and become lodged in the lungs where they may stay and develop into a disease. Current scientific and medical evidence supports the fact that simply living or working in a building containing asbestos is not dangerous as long as the asbestos is in good condition. When asbestos is damaged, worked with or disturbed and asbestos fibres are released the risk of developing an asbestos related disease is increased.
Risk factors
The likelihood of any particular person developing an asbestos-related illness depends on a number of factors, including:
- length of time a person is exposed to airborne asbestos fibres
- concentration or levels of asbestos in the air breathed
- individual susceptibility
- size and type of asbestos fibres
- influence of other factors, especially cigarette smoke. (Research has shown that smoking significantly increases the risk of lung cancer in people who have been exposed to asbestos.)
What is asbestos?
Asbestos is the generic term for several fibrous silicate minerals commonly used in the building industry between the 1940s and 1980s.
The fibres are usually:
- less than 3 microns* in diameter and
- greater than 5 microns in length.
The manufacture and use of asbestos products was banned nationally from 31 December 2003. Before the health risks were known, asbestos products were widely used because they were durable, fire resistant and had good insulation properties. Products made from asbestos cement, a bonded asbestos material included fibro sheeting (flat and corrugated), insulation, roofing shingles and guttering.
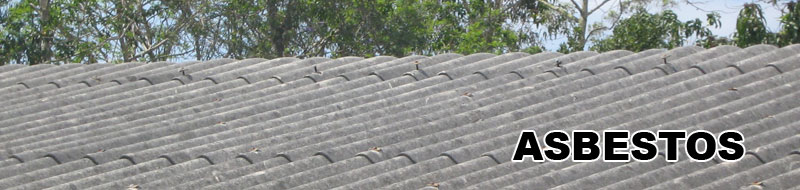
Do I have an asbestos roof?
If your roof looks like the roof below then you have an asbestos roof. If you are concerned about the state of your asbestos roof you should have a licensed professional come and look at your roof. Call Reliance Roof Restoration now on 1300 300 748.
Do I have to be home during my roofing work?
Because we work Monday to Friday, 7 a.m. to 5 p.m. most of our customers aren’t home but the vast majority trust Reliance Roof Restoration to do their roofing work while they aren’t at home. As your roof is on the exterior of your home it is not necessary for you to be there but we will need to use your water and power to perform the job. For additional security and insurance we keep a record of who is on each job site.
What happens if something is damaged during my roofing work?
We treat you and your home with complete respect. If something does unexpectedly break, we do our best to either repair or replace that item. Reliance Roof Restoration residential roof are fully insured, so claims are filed when appropriate.
What happens if my roof leaks?
If the roof leak was due to faulty workmanship and/or negligence on our behalf then it will be fixed free of charge.